RWC set-piece spotlight

The English scrum was poor against the Australians
©PA
Round three of Rugby World Cup 2015 is now in the books and just where do you start when you look back at it?
Japan’s dominant victory over Samoa? The South African pack’s bulldozing display against Scotland? Or perhaps Australia dumping England out of their own RWC?
We couldn’t decide either, so instead our weekly analysis will look at how those three victorious sides used their set-pieces as the perfect platform for their attacking ambitions.
Japanese scrum ambushes
Japan have been the gift that keeps on giving at this RWC. From set-piece innovation to attacking ambition, the Cherry Blossoms have delighted and inspired in equal measure, taking the scalps of South Africa and Samoa in the process.
In our analysis of Japan’s win over South Africa two weeks ago, we looked at how they turned their perceived weakness at the scrum into a real strength. Without going into too much depth here, they basically shift over their number eight so that he is between the feed-side lock and flank, essentially creating ‘channel 0.5 ball’.

You can see it in action here against South Africa. Hendrik Tui positions himself between the left lock and openside flanker and with a clean strike from the hooker, Japan have the ball in and out of the scrum in no more than a second.
It’s been a feature of Japan’s play all tournament thus far and heading into their game with Samoa, the Blossoms had utilised this unorthodox formation/technique on all nine of their attacking scrums with a 100% success rate.
Unsurprisingly, when Japan packed down for the first time against Samoa, they rolled it out again, reclaiming their own ball within a fraction of a second. A ‘fraction of a second’ may sound hyperbolic, but it’s not, this is just how well-drilled and effective their pack and scrum-half are as a unit.
However, with Samoa struggling with their discipline and first-choice loosehead prop Sakaria Taulafo sent to the bin, Japan changed tact.

As you can see, Ryu Holani is stationed at the base of the scrum, but doesn’t flip over to the nearside as he usually would when they want quick, clean ball.
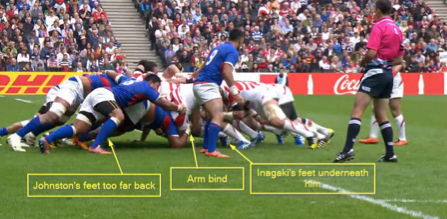
The Japanese loosehead, Keita Inagaki, is in the perfect position to scrummage, with his feet underneath him and a longer bind that the above image does not really do justice to. Conversely, Census Johnston’s feet are much further behind him, meaning he doesn’t have as much control over his body as Inagaki, and his bind is just on the arm of the loosehead.
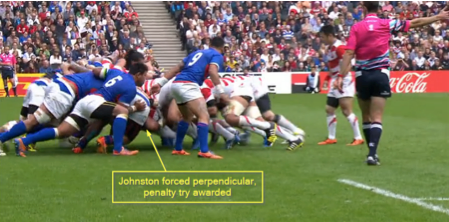
The pressure Japan exert on the Samoan scrum through Inagaki quickly turns Johnston inside out and with the try line just a few metres away, the Blossoms are rightfully awarded a penalty try.
Japan scrummaged in this orthodox fashion twice more in the match and both times they were awarded penalties. No pair of coaches may have boosted their profiles as much as Steve Borthwick and Marc Dal Maso have at this RWC.
South African driving lineout
While Japan, paradoxically, were innovating by being more conventional, the Springboks were utilising one of the staples of South African rugby to deadly effect against Scotland.
The Springbok set-piece had been derailed by Japan, but earnt back a lot of pride with a dominant display against Samoa and they clearly carried that momentum into their game with Scotland this past weekend.
Having already gouged Scotland multiple times with driving lineouts from within their own half, South Africa finally had the opportunity to launch one deep in Scotland territory towards the end of the first half.
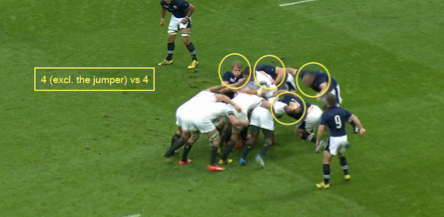
If you take the jumper out of the equation, it’s a case of four against four at this maul, but just mere seconds after the lineout has been thrown and Scotland are already dead in the water. The Boks are drilled to perfection, all tightly bound with low body heights, whilst Scotland are at sixes and sevens. The South African maul starts to quickly advance and Blair Cowan, who is at the top of the shot, rapidly joins Scotland’s defensive effort.

With a few more metres easily gained and South Africa reinforcing their drive, Fraser Brown and Josh Strauss add themselves to the retreating Scottish pack.
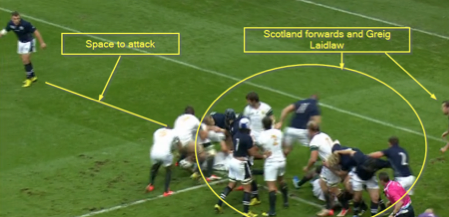
If you don’t set and counter the South African driving lineout at source, it becomes a case of picking your poison as the defending team. If you don’t commit more players to the maul, the Boks will march over the try line, but if you do, you risk opening up holes in your defensive line. Scotland ultimately chose the latter and in the image above you can see the space it opens up and how seven Scottish forwards and Greig Laidlaw are now completely out of play.

South Africa executed well, with Fourie du Preez angling towards the line, drawing in Duncan Weir, which then creates an easy pass to JP Pietersen who has no trouble running in the try, especially with Handré Pollard and Damian de Allende drawing attention on the outside.
Australian width and guile
Australia seem to excel perennially based upon the width and ambition of their back line, which is often capable of cutting open the most resolute of defences. What has kept other nations in with a shout against them has been their set-piece deficiencies. So, what happens when they cure those deficiencies? Well, they put 33 points on England knock them out of their home RWC.

Australia throw long to the back of their lineout, an indication that, with their good field position, they may be looking to run a strike move straight off the top.

Instead, they take the ball to ground, quickly recycle at the ruck and David Pocock peels off and runs around the corner, tying in three England forwards with a carry that brings Australia five or six metres.
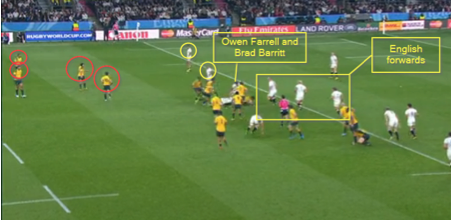
The Wallabies again get quick ball at the ruck and swiftly go again, this time tying in Owen Farrell and Brad Barritt, leaving four Australian backs lined up against Jonathan Joseph and Anthony Watson. On the nearside of the ruck, Australia have also isolated three English front rowers, giving the Aussies a tempting target to run at.

As expected, the England defence floods across to support Joseph and Watson but Will Genia, who fakes the run and/or pass to the left, turns directly back and passes to Bernard Foley on the switch.
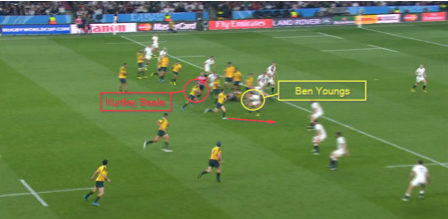
Having previously tied up Farrell and Barritt at the ruck, Foley and Kurtley Beale are able to run at Ben Youngs and a number of English forwards. Foley does the right thing, running towards the open space outside of Youngs, fixing England’s most mobile available defender, before a sumptuous inside flick to the arriving Beale. A second or two later and Beale is fixing England’s last line of defence, Mike Brown, and making a simple pass to Foley for the fly-half to cruise over the try line.
Oh, and the initial lineout from which Australia sprung this move? It was the result of a dominant Australian scrum squeezing a penalty out of England. That’s the icing on the set-piece cake for the Wallabies.