
Manuel Vareiro Interview: From social media criticism to climbing to the top
25 March 2026
The shockwaves of Japan’s 34-32 victory over South Africa on Saturday are still reverberating around the rugby world.
You could be forgiven for still having to pinch yourself to believe it happened, and it’s difficult to convey just how momentous of a result it is, especially when there is no comparable context for it in the history of rugby, let alone the Rugby World Cup.
Undoubtedly songs will be sung and stories will be written about that truly extraordinary afternoon in Brighton, but putting aside the poetic beauty of the result, not to mention what it does for Japanese rugby moving forward, just how did the Cherry Blossoms do it?
We delve into the nuts and bolts of the Japanese performance and try to identify just how they were able to upset the two-time world champions, South Africa.
Textbook technique
Japan’s coach Eddie Jones deserves rampant praise for the job he has done with the Blossoms, instilling into them all the discipline and technique for which his previous sides have been famed. In no areas was this more apparent on Saturday than in their defence and their work at the breakdown.
From the first minute to the last, Japan were tackling the muscular South African carriers in pods of two. The first tackler would take the legs, whilst the second would take the upper body. In theory, as well as in practice for most of the game, the lower tackler stops the carrier’s momentum immediately, whilst the higher tackler prevents him from making an offload and continuing the attack.
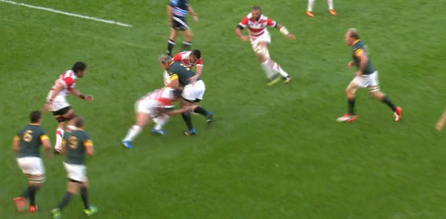
This technique has the built-in failsafe that if the lower tackler is brushed off or overpowered by the carrier, the higher tackler can still stop the attack and prevent any substantial line breaks. All international teams do it, but it was the efficiency with which Japan used it that was so impressive.
If successfully used, it also gives the defending team a significant advantage at the ensuing breakdown. Assuming the lower tackler is successful in bringing down the carrier and the higher tackler has prevented any initial offloads, the higher tackler is then able to disengage from the tackle area, show clean air to the referee, and then pounce at the breakdown, potentially just a fraction of a second after the carrier hits the floor.
Below, you can see Japan utilise this perfectly, as the first man at the breakdown (the higher tackler) is able to widen his base and latch onto the ball before the Springbok ruckers can arrive. Japan turned the ball over in this example, despite being outnumbered two to one at the contact area.

Ingenuity and innovation
Despite giving up 56kg and plenty of experience to the South African pack, Japan were able to use the set-piece as a base to launch their attacking play, thanks in large to the tactical genius of coaches Steve Borthwick and Marc dal Maso.
Starting in the scrum, Japan were regularly being marched backwards by the heavyweight Springbok pack, but they found a way to still get quick, clean ball from their retreating scrum. At the engage, the Japanese eight, Hendrik Tui, was lined up in the usual position for a number eight, between the two locks. As you can see in the image below however, as soon as the two packs engage, he quickly shifts over and stations himself between the blindside flanker and left lock.
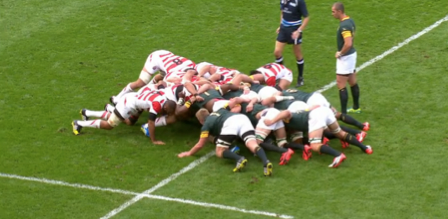
This creates a new channel for the ball that bisects the left lock and blindside flanker. It may not seem like much, but the fractions of a second it takes off the amount of time required to get the ball out of the scrum are vital for Japan, especially when their pack is being marched backwards.
In the NFL, there are few measurable as important as the amount of time between the center snapping the ball and the quarterback releasing it, and for Japan, the time taken to get the ball out of the scrum is a very similar key to success.
So, that’s how dal Maso has put his blueprint on the Blossoms, but what has been former England captain Borthwick’s input?
Again, it’s all about ingenuity at the set-piece. Below you can see a Japanese lineout about 10m out from their own try-line. Every ounce of your common sense tells you to take a short lineout to the front jumper, try to gain a few precious metres with the maul and then kick clear, and that’s exactly what Japan are set up to do.

What follows however catches South Africa off-guard, gives Japan room to clear their lines under much less pressure and best of all, is wonderfully simplistic. The front pod dissipated, and Luke Thompson and Michael Broadhurst quickly dropped further infield, along with Hitoshi Ono, who had been the separate man at the back in the initial set-up. From there, Thompson switched from lifter to jumper and was already in the air whilst South Africa were still trying to readjust to Japan’s new position.
Japan’s clearance actually turned out to be a poor one, but their simple adjustment at the lineout meant that they didn’t have to deal with any South African attempts to steal the ball and/or counter-maul.
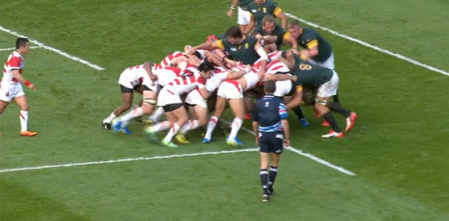
The lineout was also used extremely well as an attacking platform by the Blossoms, not least so when their 11-man maul bundled its way over the try line in the first half. Their first attempt to do so had been messy and uncontrolled, but with a penalty advantage on their side, they made the ambitious move to kick again to the corner and try again. This they did extremely well and though the Springbok pack had the weight advantage, the lower body heights of Japan told and, combined with the weight of numbers, the Blossoms were able to barge their way over the line.
Attacking options
Away from the coalface of the scrum, the intricacies of the lineout and the energy-sapping defensive work, it should be noted that Japan played with a freedom and ambition that was simply uplifting to watch.
Confronted with the situation below, where Japan have won the turnover deep inside their own 22, many teams would opt to kick the ball downfield, alleviate pressure and play a territory game.

Japan, noticing they’re confronted with Jannie du Plessis, Lood de Jager and a lot of open space, decided to run it. This forced the outside backs of South Africa to rush in and constrict the space, which allowed Japan to put the ball through the hands and find space to run it down the wing. They were ultimately turned over at the conclusion of the move, but it brought them a good 50m of territory, as opposed to the 30m or so that you might expect from a kick and return.
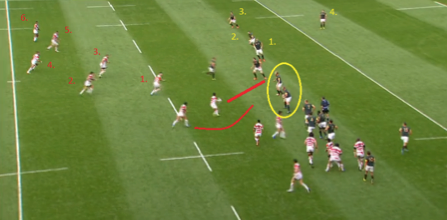
This next shot actually illustrates something which Japan did wrong, but may be the best example of their ambition, energy and potential all rolled into one.
The back line looks organised, with a plethora of options available, and is something you might expect to see on the first or second phase after a lineout or scrum. It’s actually the first phase after a big break from full-back Ayumu Goromaru. Seconds before, everyone in shot was tearing down the pitch in support, rather than free to set themselves up as they would be at a set-piece or after a short carry.
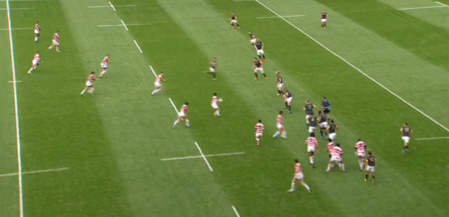
The Japanese fly-half Kosei Ono should be in heaven with what he can see in front of him. The South African defensive line is on the back foot, not to mention blowing somewhat after having sprinted back 50m or 60m and he has a numerical advantage on the outside, as well as a blindside option on his shoulder.
Unfortunately for Japan, Ono gets a little ahead of himself in this position and quickly ships the ball on, negating many of the potential moves (decoy runners, loops, missed passes etc) he could have tried to unlock the South African defence if he had taken the ball to the gain line. Given the enormity of the match, it was understandable from Ono, but it’s the position that Japan got themselves into which is encouraging.
If Ono had recognised there were two forwards in front of him and ran to their outside, essentially targeting the man already beginning to blitz out of the defensive line, Japan would have had a six-to-four man advantage and given the intricate hands they showed in their final two tries of the game, it’s a position they may well have taken advantage of.
The fact we’re talking not only about Japan beating South Africa, but also leaving points out there, just adds to what an incredible result the game was for the Blossoms.
The likes of Goromaru, Michael Leitch and Fumiaki Tanaka all wrote themselves into rugby legend on Saturday thanks to their starring roles in the victory, and though murky waters may be ahead for the Japanese RWC in 2019 and their new Super Rugby franchise, there is nothing but joy about Japanese rugby right now.


